Proxmox & Pi-hole: V2 Core Infrastructure
Reinstalling Proxmox VE and Pi-hole, and adapting both to fit within the new network architecture.
Overview
With the network segmented into three VLANs, the next phase was standing up core infrastructure on pavilion. V1’s Proxmox installation was wiped entirely, it had no VLAN awareness, leftover configurations, and no clean foundation for V2. This post covers the fresh Proxmox deployment, essential post-install steps, and a new Pi-hole configuration.
Proxmox VE — 2nd Time
Why a Full Reinstall
The V1 Proxmox instance ran on a flat network with no VLAN configuration. While migrating an existing node to a segmented network is technically possible, a clean reinstall configured correctly from the start felt like the correct option, and eliminated any legacy configuration that may cause issues down the line.
Installation
Proxmox VE was installed from the official ISO with the management IP set statically on VLAN 20 during installation. The FQDN was set to pavilion.lan to match the OpenWRT domain configuration.
The resulting bridge configuration in /etc/network/interfaces:
1
2
3
4
5
6
7
auto vmbr0
iface vmbr0 inet static
    address  192.168.20.XX/24
    gateway  192.168.20.1
    bridge-ports enp3s0
    bridge-stp off
    bridge-fd 0
All VMs and containers attach to vmbr0, which bridges to the physical ethernet interface. From the network’s perspective, each workload appears as its own device on VLAN 20.
Post-Install
Disabling the Enterprise Repository
Proxmox ships with the enterprise repository enabled by default, requiring a paid subscription. Without a subscription key, apt update fails with authentication errors.
1
2
3
4
5
6
7
8
# Disable the enterprise repo
echo "# disabled" > /etc/apt/sources.list.d/pve-enterprise.list

# Enable the community (no-subscription) repo
echo "deb http://download.proxmox.com/debian/pve bookworm pve-no-subscription" \
  > /etc/apt/sources.list.d/pve-no-subscription.list

apt update && apt dist-upgrade -y
The community repository is fully functional for homelab use. The enterprise repo is for organizations requiring long-term support contracts.
Removing the Subscription Nag
The Proxmox web UI displays a subscription dialog on every login when no license is active:
1
2
3
sed -i "s/data.status !== 'Active'/false/" \
  /usr/share/javascript/proxmox-widget-toolkit/proxmoxlib.js
systemctl restart pveproxy
Running this command in the shell should remove this nagging notification.
Pi-hole - 2nd Time
Container Deployment
| Setting | Value |
|---|---|
| CT ID | 100 |
| Base Image | Ubuntu 22.04 (LXC template) |
| VLAN | 20 — Lab |
| CPU | 1 core |
| RAM | 512 MB |
| Disk | 8 GB |
| Nesting | Enabled (required) |
LXC nesting must be enabled, Pi-hole’s FTL process will not run correctly inside a container without it.
Installation was different this time around. I used a community resource, Proxmox VE Scripts, which provide helper script to install various services. There was an install script for Pi-hole and I decided to use it.
BE CAREFUL when running scripts from the internet. VERIFY the SCRIPT and SOURCE. For More Details
1
bash -c "$(curl -fsSL https://raw.githubusercontent.com/community-scripts/ProxmoxVE/main/ct/pihole.sh)"
Choose the Advanced Install option, most of my choices were similar to the first install. Except those relating to my new network architecture.
Solving Cross-VLAN DNS
This is where V2 introduced a problem V1 never had. Pi-hole defaults its listening mode to LOCAL, accepting DNS queries only from its own subnet (VLAN 20). Trusted devices on VLAN 10 were rejected with:
1
ignoring query from non-local network
The fix: In the Pi-hole admin UI → Settings > DNS > Interface settings → set listening mode to Permit all origins.
Alternatively, in /etc/pihole/pihole.toml:
1
listeningMode = "all"
This is safe in this deployment because Pi-hole is on a firewalled internal network and port 53 is not exposed externally. The firewall ensures only trusted internal traffic reaches it.
Local DNS Records
Pi-hole serves local DNS records for all lab services, mapping each subdomain to the Nginx Proxy Manager IP. NPM then routes requests to the correct backend based on hostname. (See NGINX post for more details)
| Hostname | Resolves To | Service |
|---|---|---|
proxmox.jamcre.dev | NPM IP | Proxmox web UI |
pihole.jamcre.dev | NPM IP | Pi-hole admin |
nginx.jamcre.dev | NPM IP | NPM admin panel |
wazuh.jamcre.dev | NPM IP | Wazuh dashboard |
All four records resolve to the same IP, the hostname in the request is what NPM uses to route to the correct backend service.
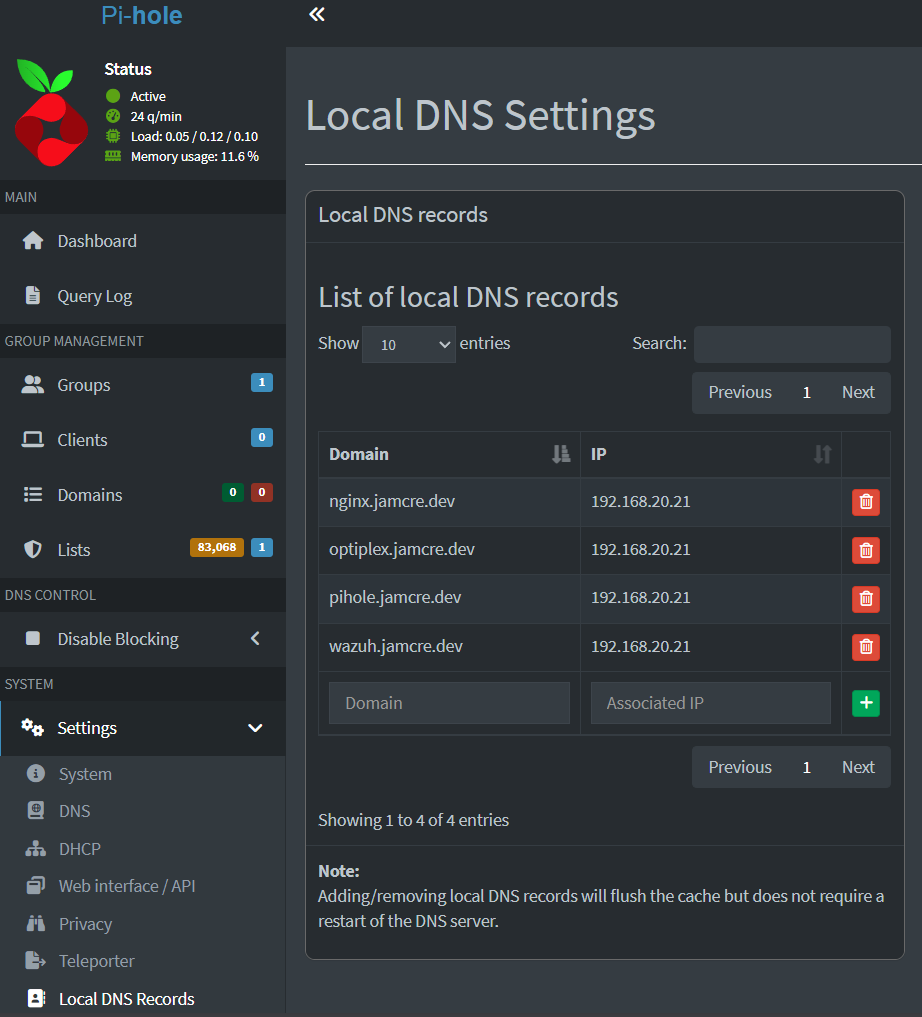 Local DNS records mapping all lab subdomains to NPM
What’s Next
Pavilion is running Proxmox with Pi-hole handling DNS for the VLANs. The naming infrastructure is in place, every service deployed from here will be accessible at a clean hostname rather than an IP and port combination.
Next: Nginx Proxy Manager, the wildcard SSL certificate, and routing all those hostnames to their backend services over HTTPS.